
Inside the software
A lighting console and a media server,in one show file.
ScreenLight does not bridge two applications together. Fixtures, playback, timecode and video live in the same document, on the same transport, addressed from the same patch.
- PAGES
- 11
- LAYERS
- 4 × 8 × 3
- SUBMASTERS
- 10 + GM
- COMP
- 120 fps
- ART-NET
- 40 Hz
- SHOW FILES
- 1
ProgramF2
Select, build, record — keypad or screen.
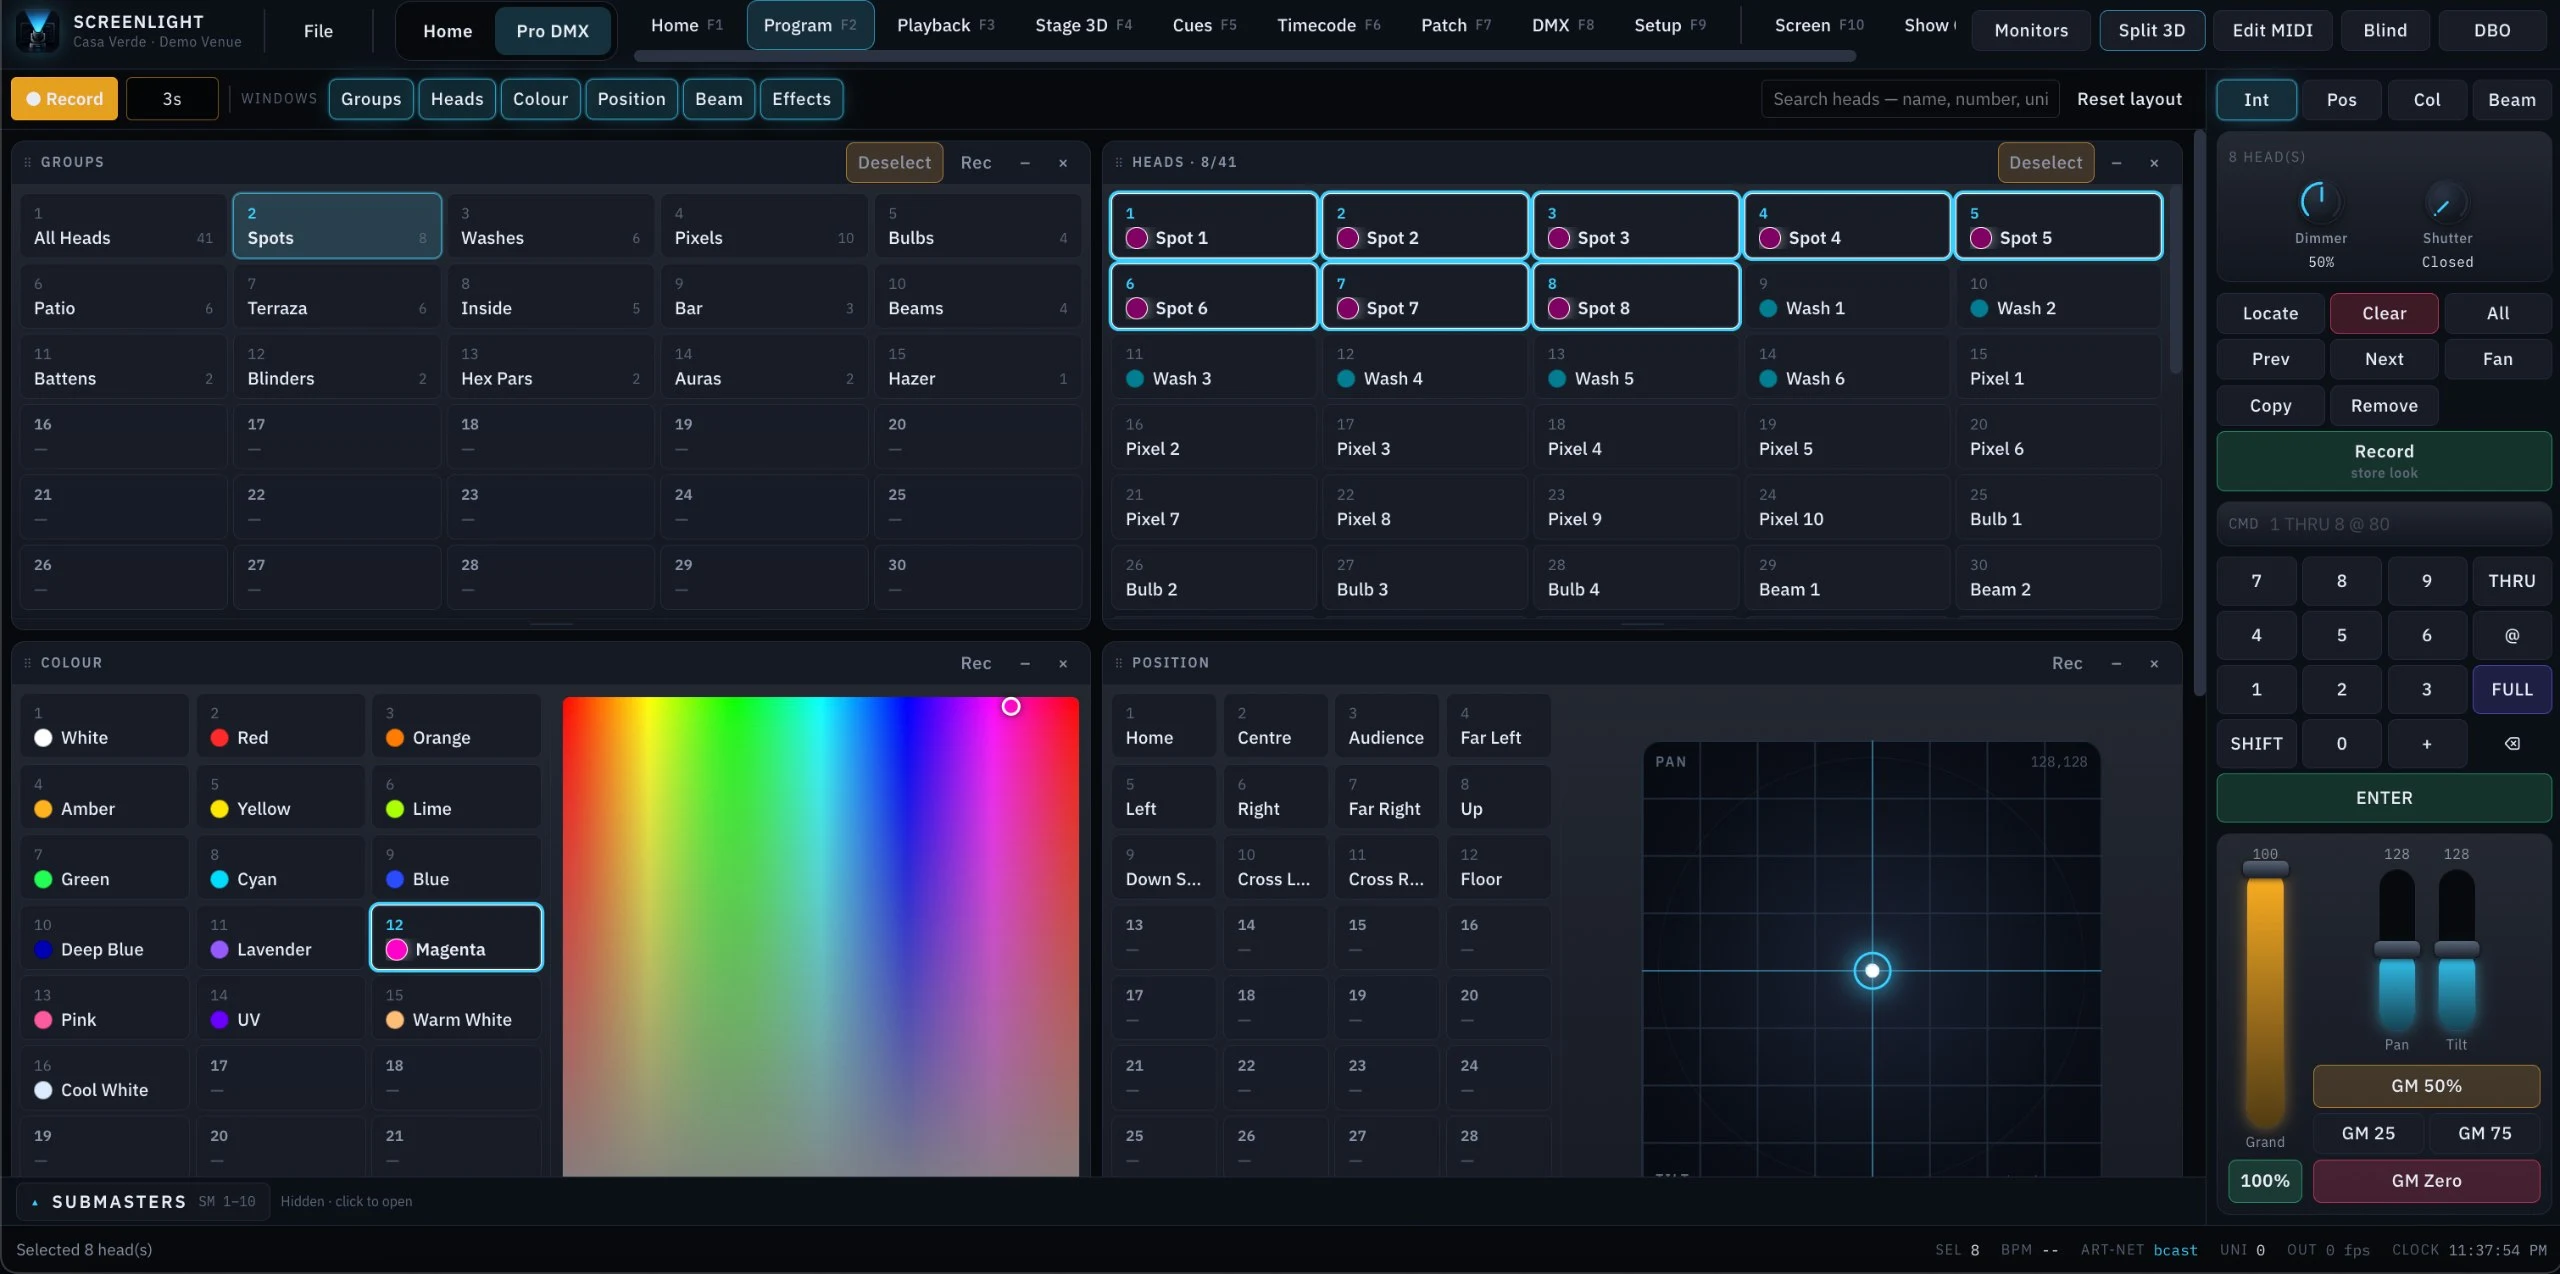
One programmer running at two speeds. Click a head, click a colour, hit Record — that is the whole workflow if you have never touched a console. Groups arrive both ways at once: by type (Spots, Washes, Pixels, Bulbs, Blinders, Hazer) and by where they physically are (Patio, Terraza, Inside, Bar), so you can select the room instead of the rig. Colour by named gel or by picker, position by named preset or by pad. Then, when you want the pro layer underneath, the command line and the encoders are on the same screen.
- Simple: click to select, click a swatch, hit Record — no syntax required
- Pro: command line with THRU, @ and FULL — type 1 THRU 8 @ 80
- Groups by fixture type and by venue area, on the same grid
- Every window docks, minimises and records on its own — Reset layout puts it back
- Locate, Clear, Prev, Next, Fan and Copy across the selection
ScreenF10
A media server in the same show file.
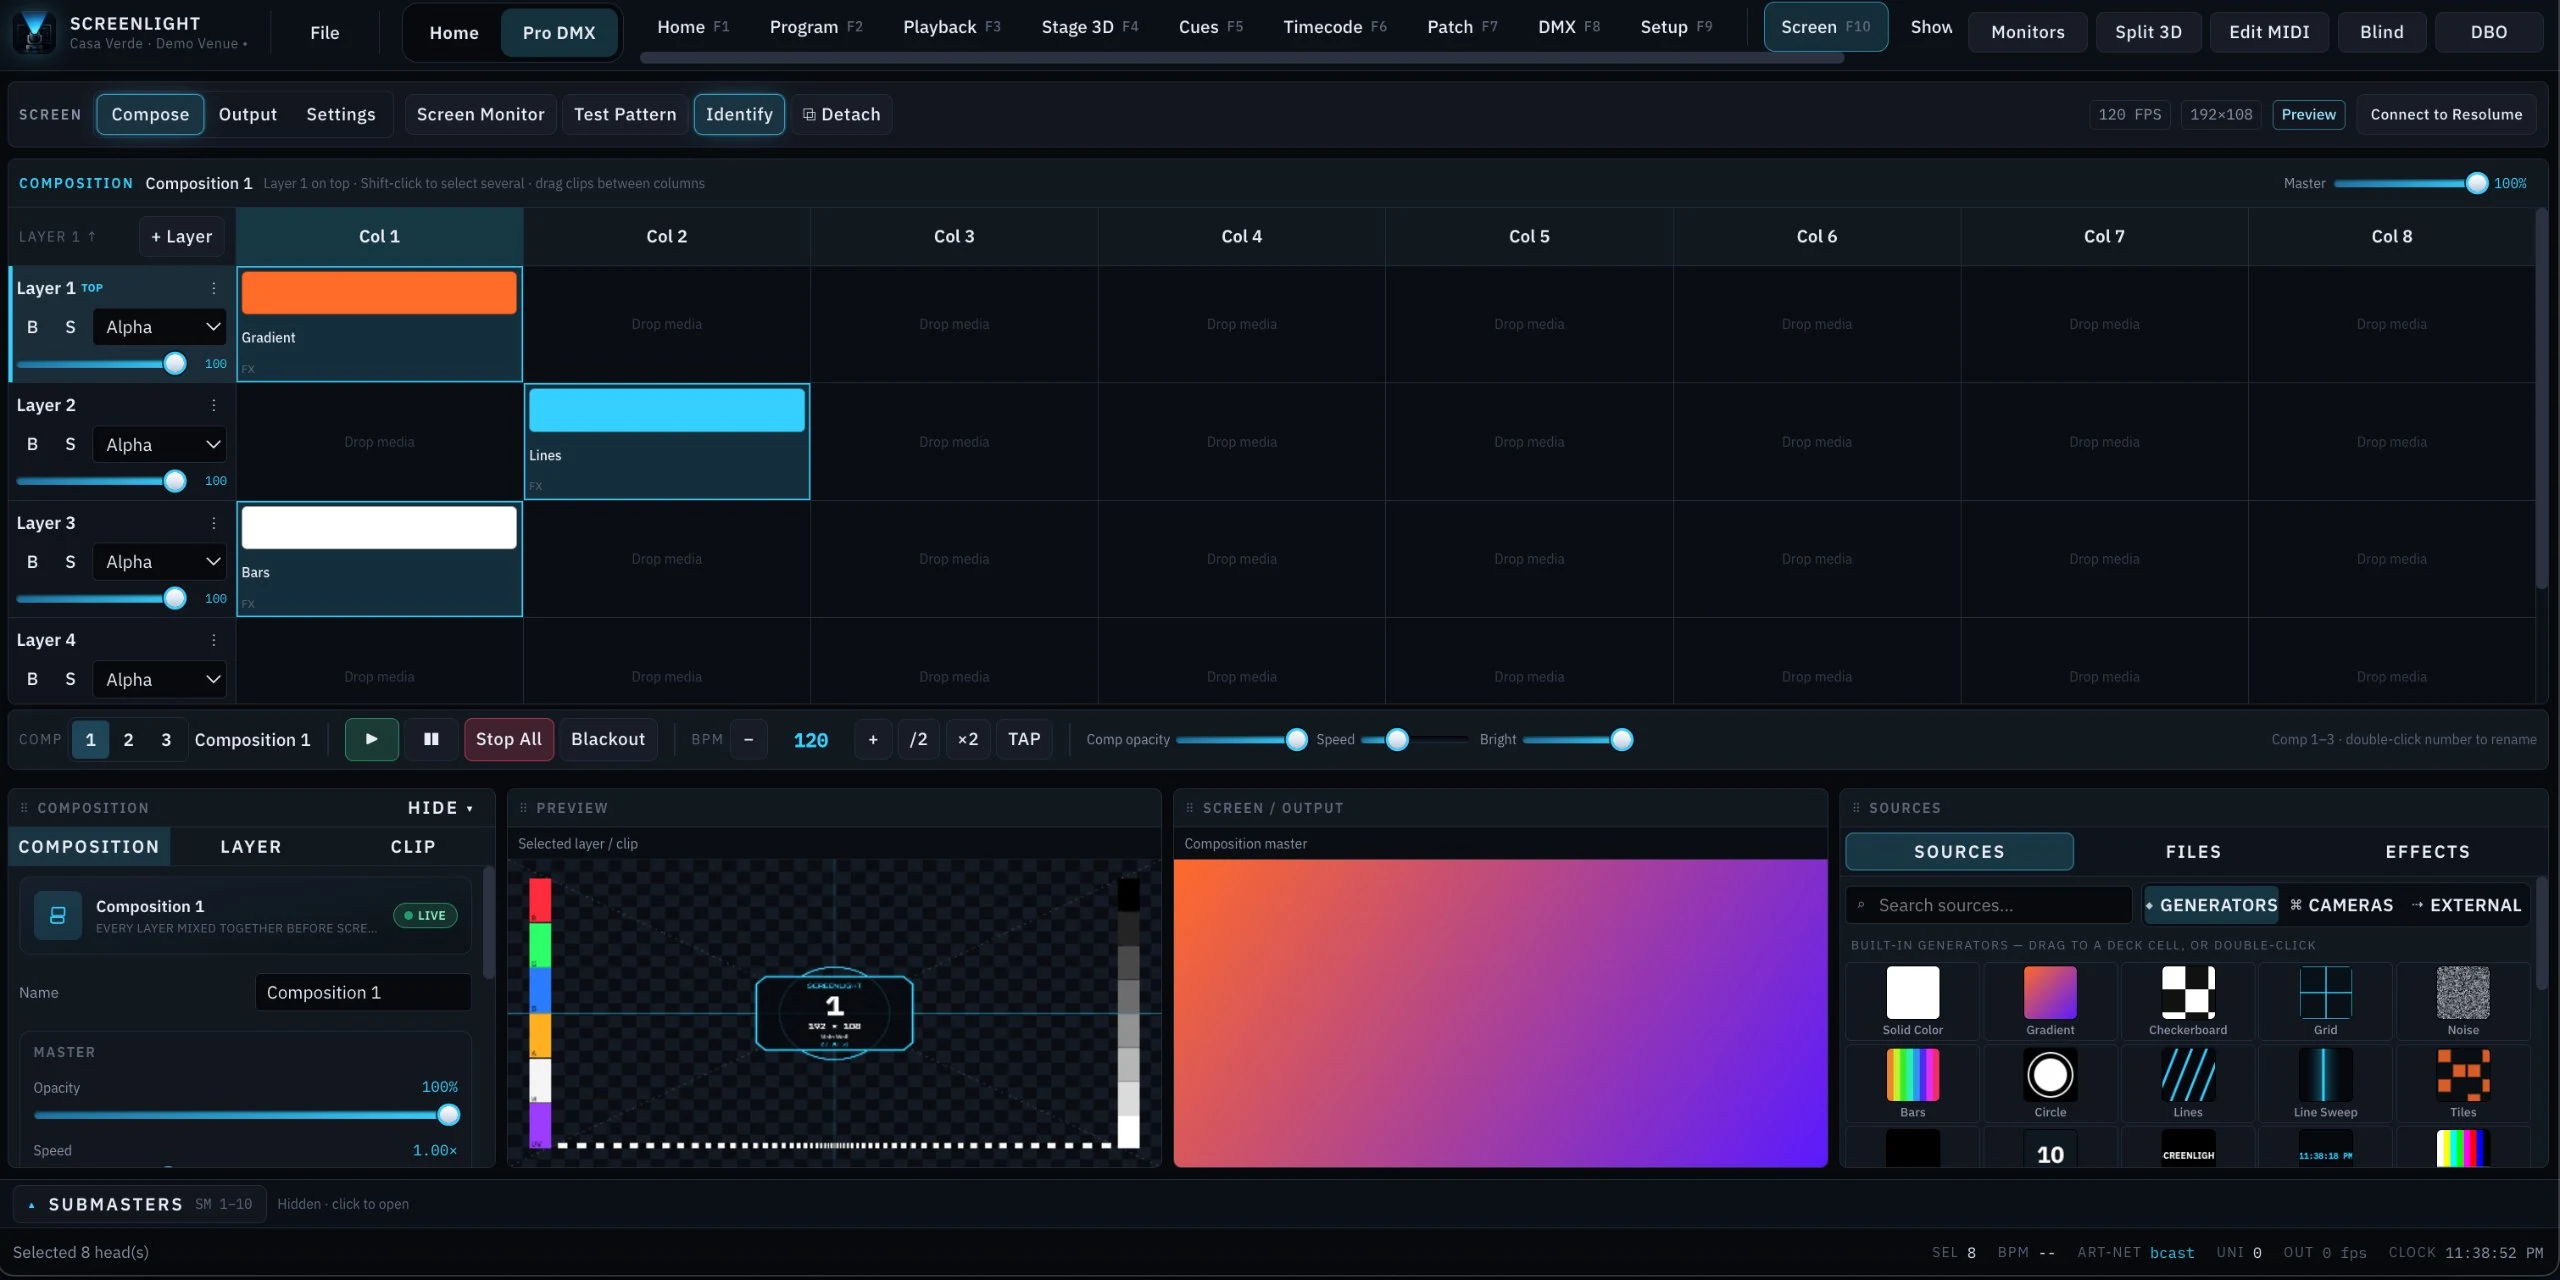
Layers and columns of clips, mixed through blend modes into one composition master, with three compositions you can cut between. Generators, cameras and external inputs feed it — solid, gradient, checkerboard, grid, noise, bars, circle, lines, line sweep, tiles, counters and clocks are built in, so a wall has something to play before a single file is imported. Output goes to your screens, or straight into Resolume Arena.
- Four layers by eight columns per composition, three compositions live
- Blend mode, opacity, blind and solo per layer
- Built-in generators, live cameras and external inputs as sources
- Composition master with opacity, speed and brightness, plus Stop All and Blackout
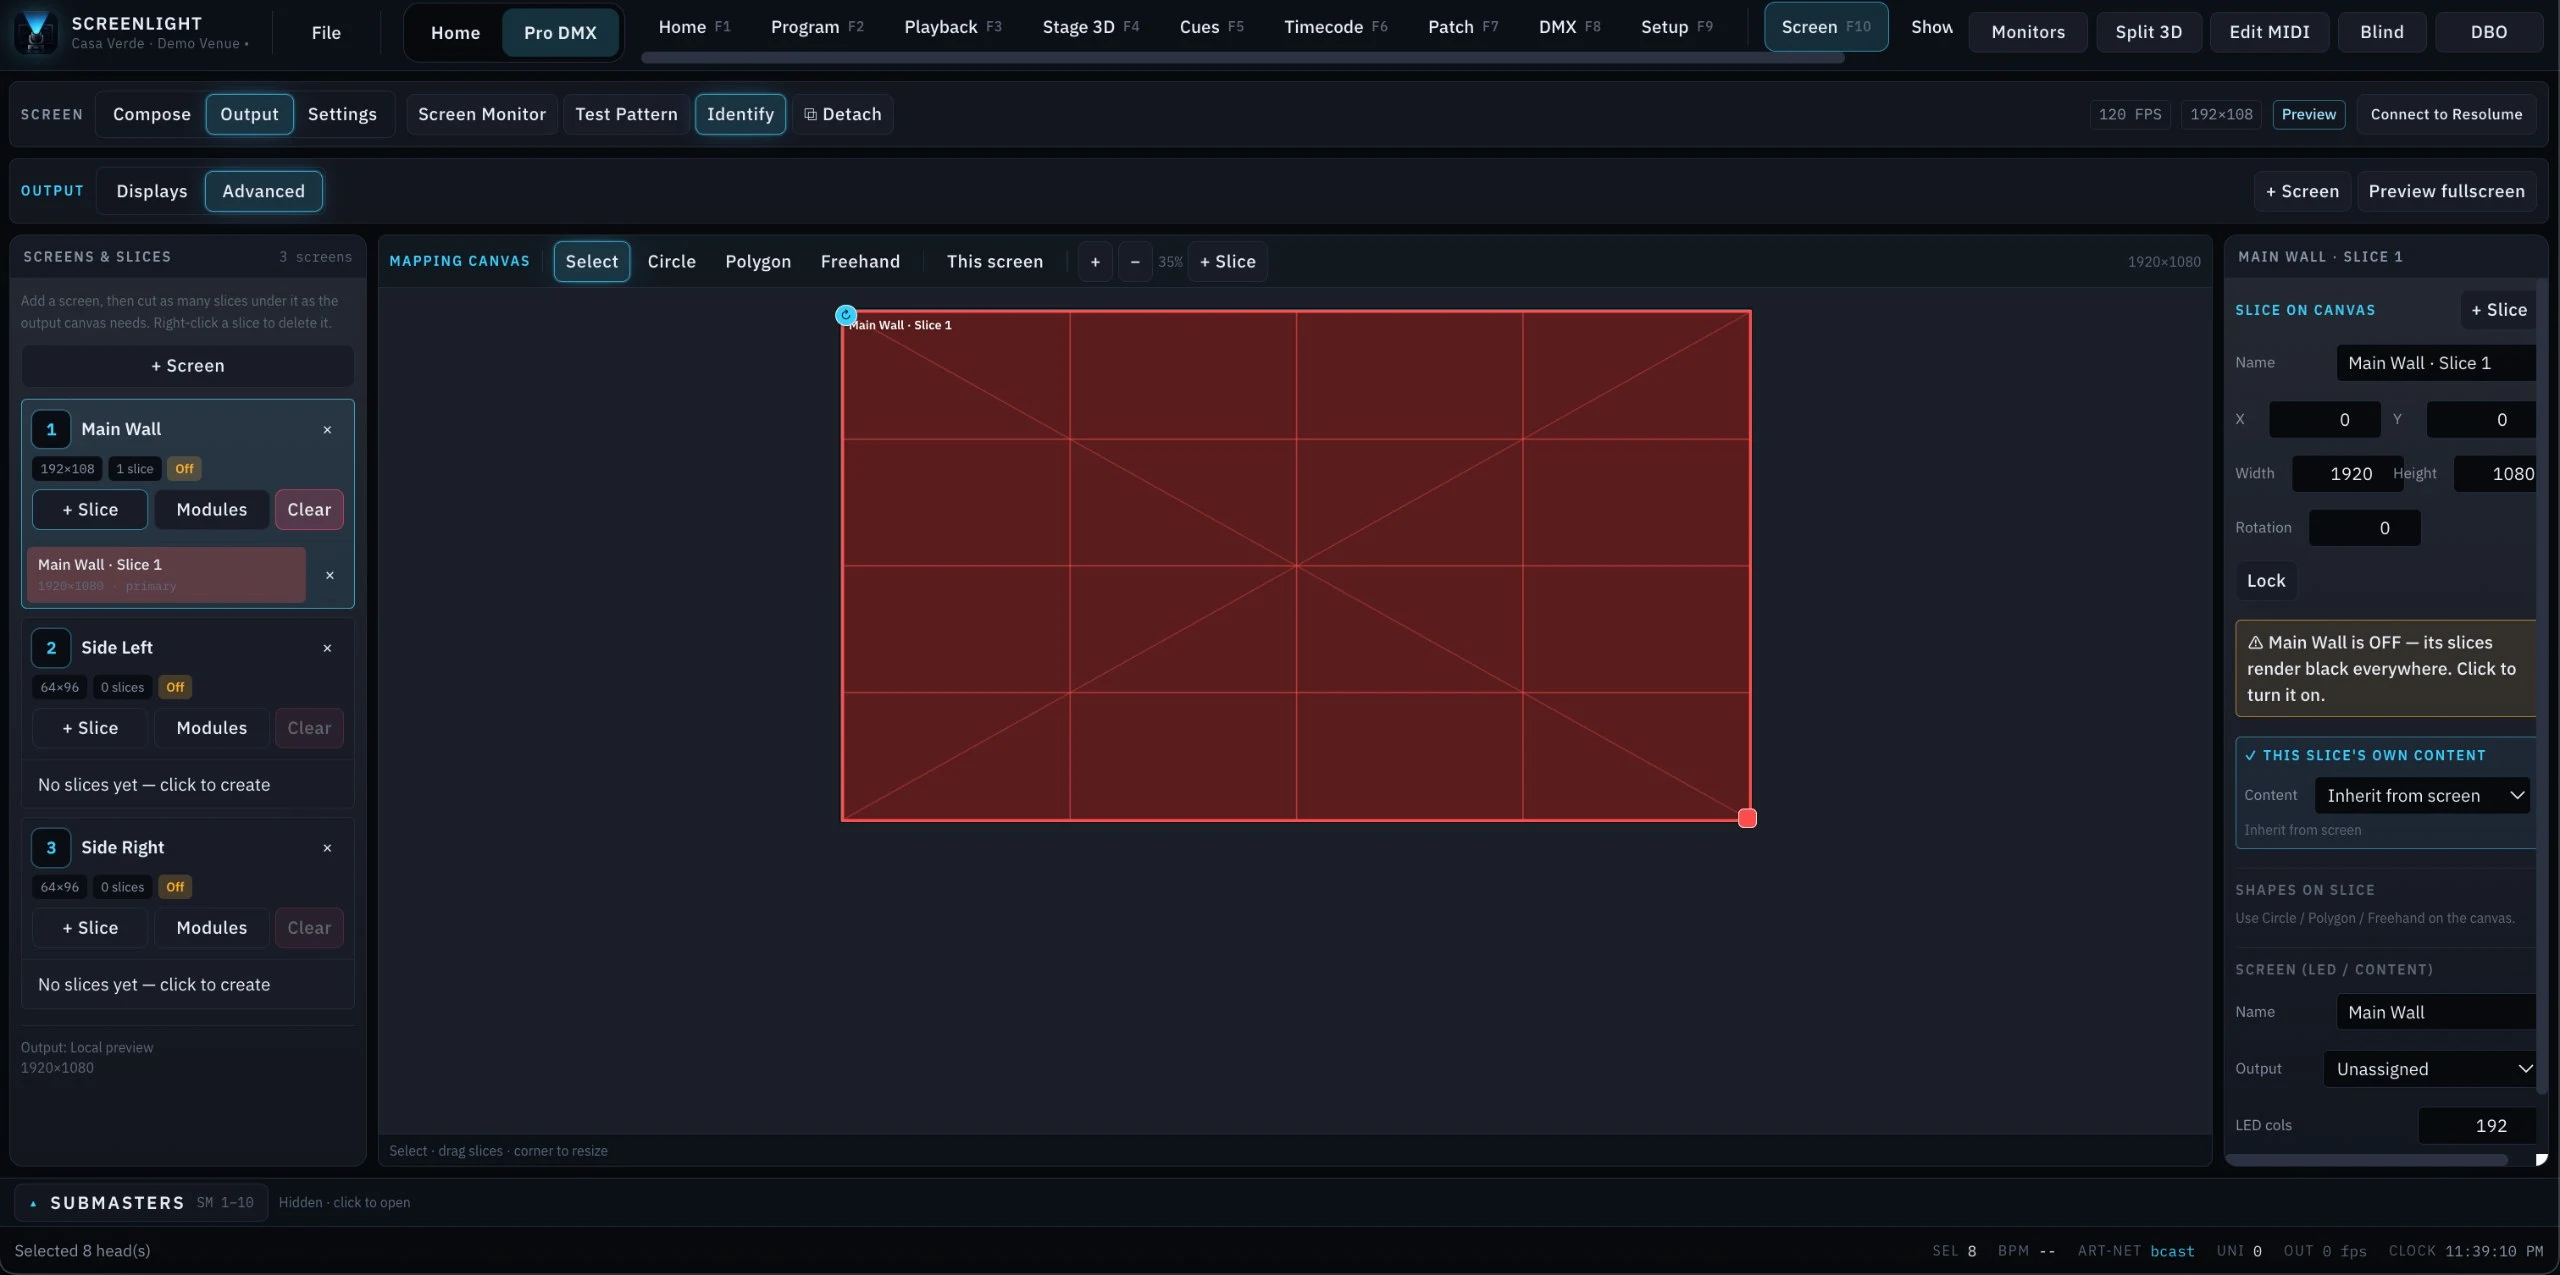
- Map the output — slice a wall with rectangles, circles, polygons or freehand shapes
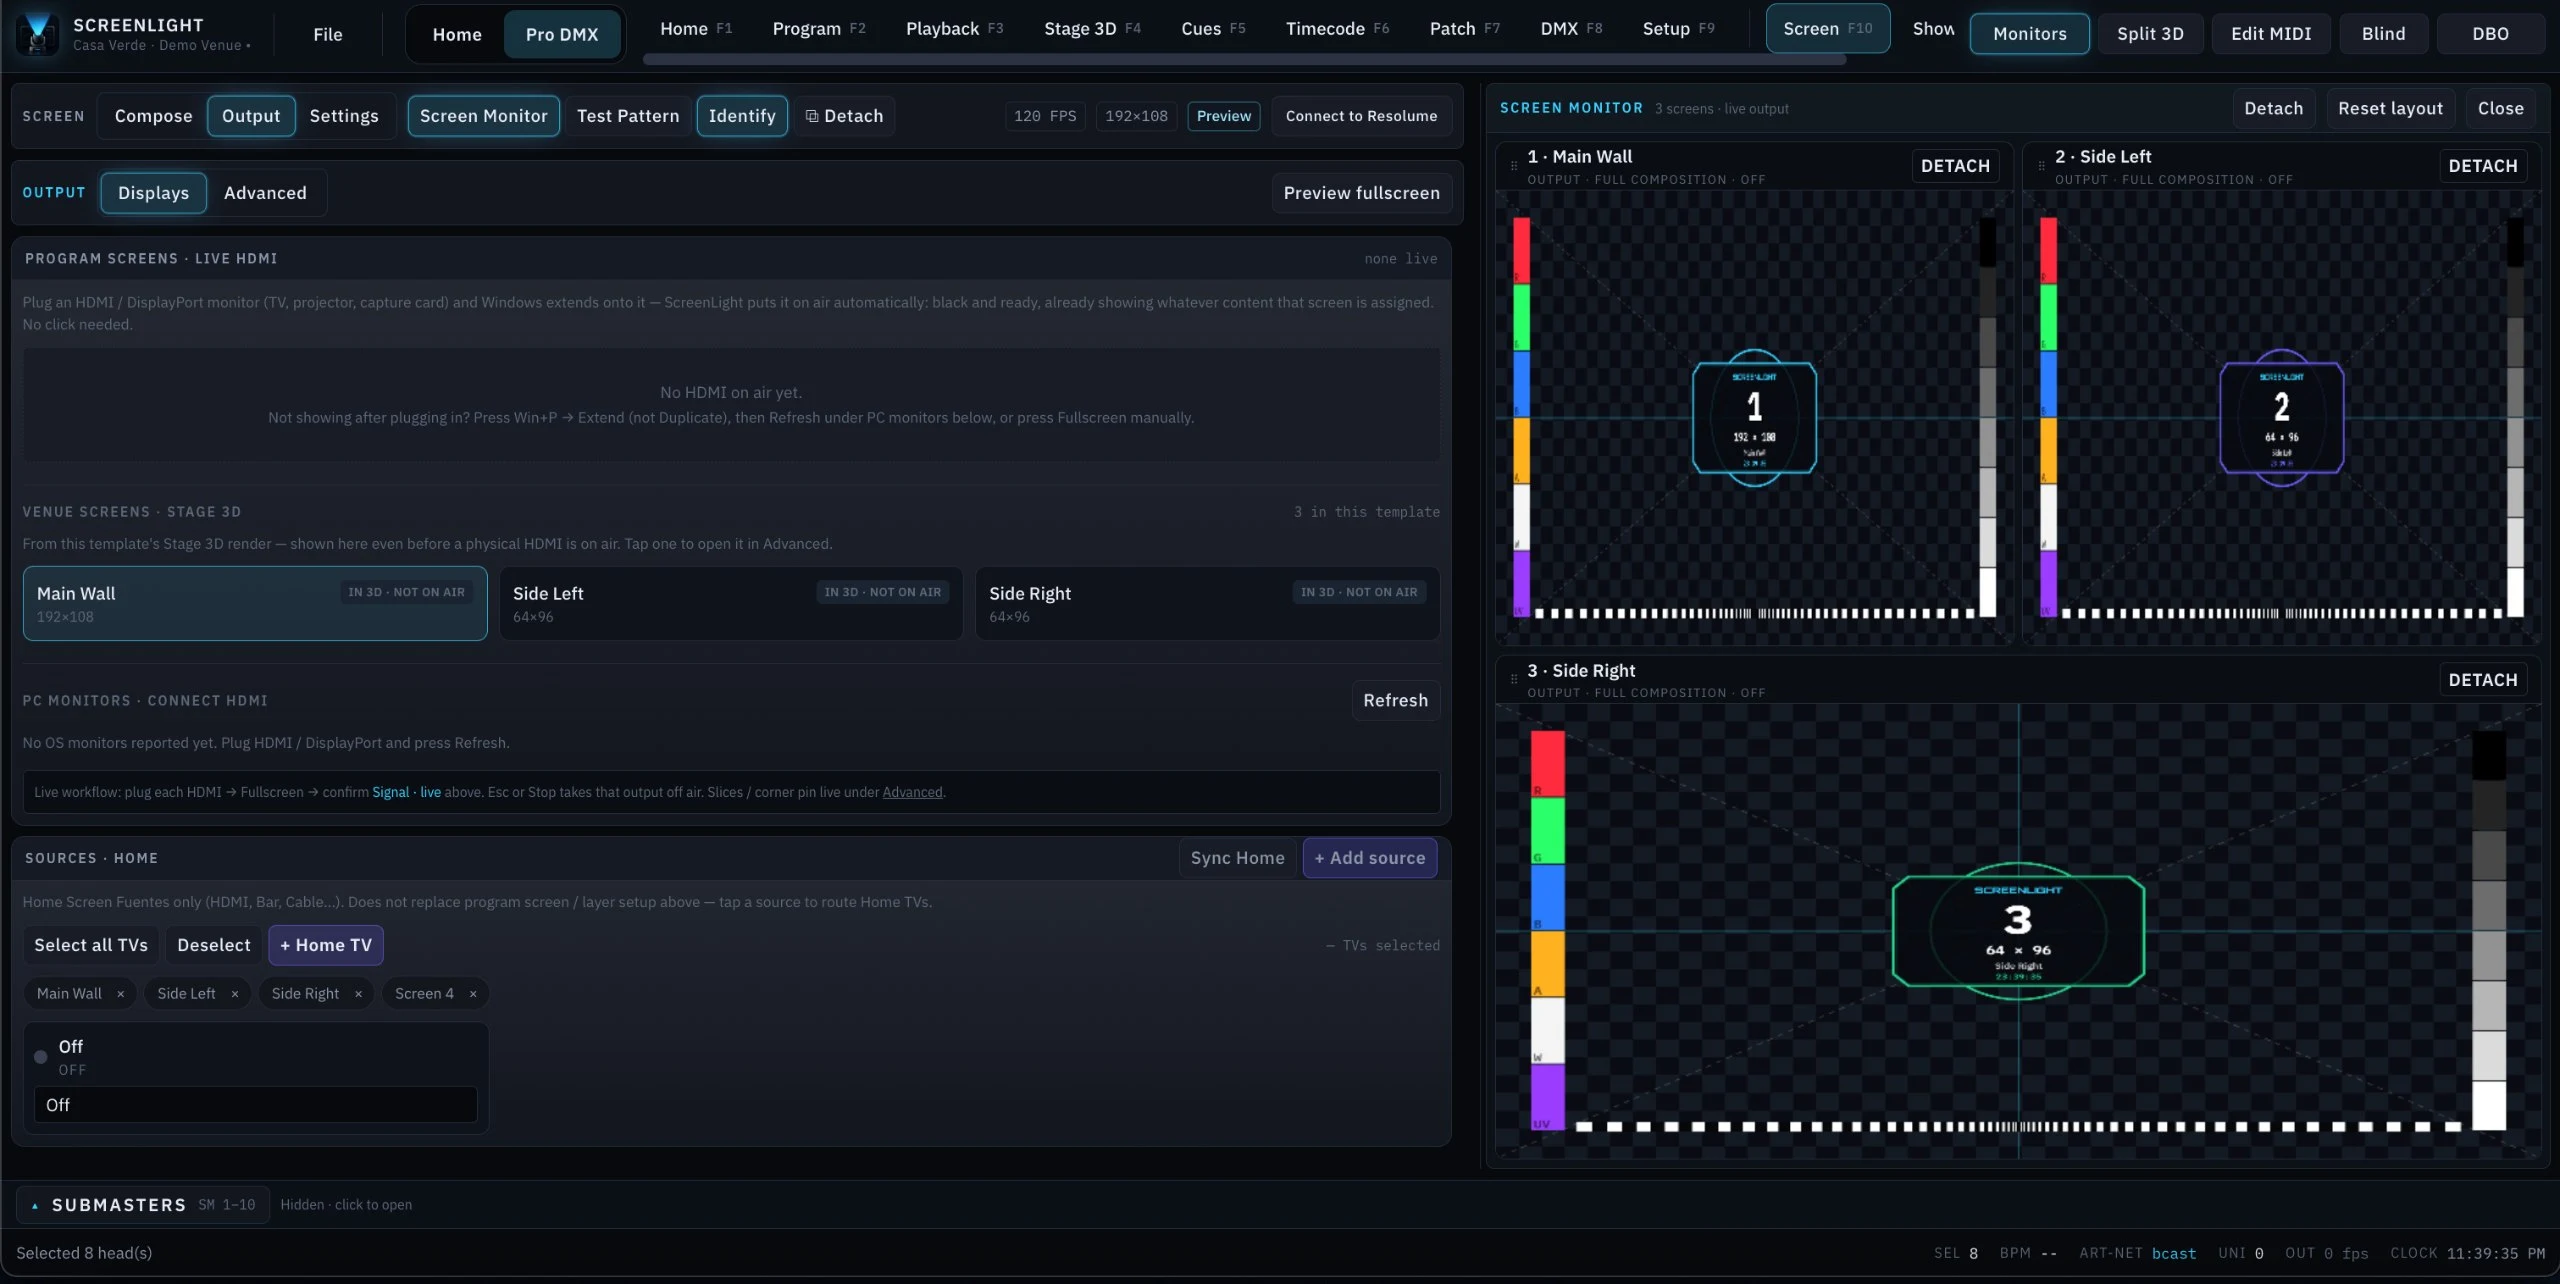
- Plug a monitor, projector or LED processor in and it goes on air by itself
- Preview, screen monitor, test pattern and identify — the tools you would use to align a mapped wall
TimecodeF6
Lock the show to the track.
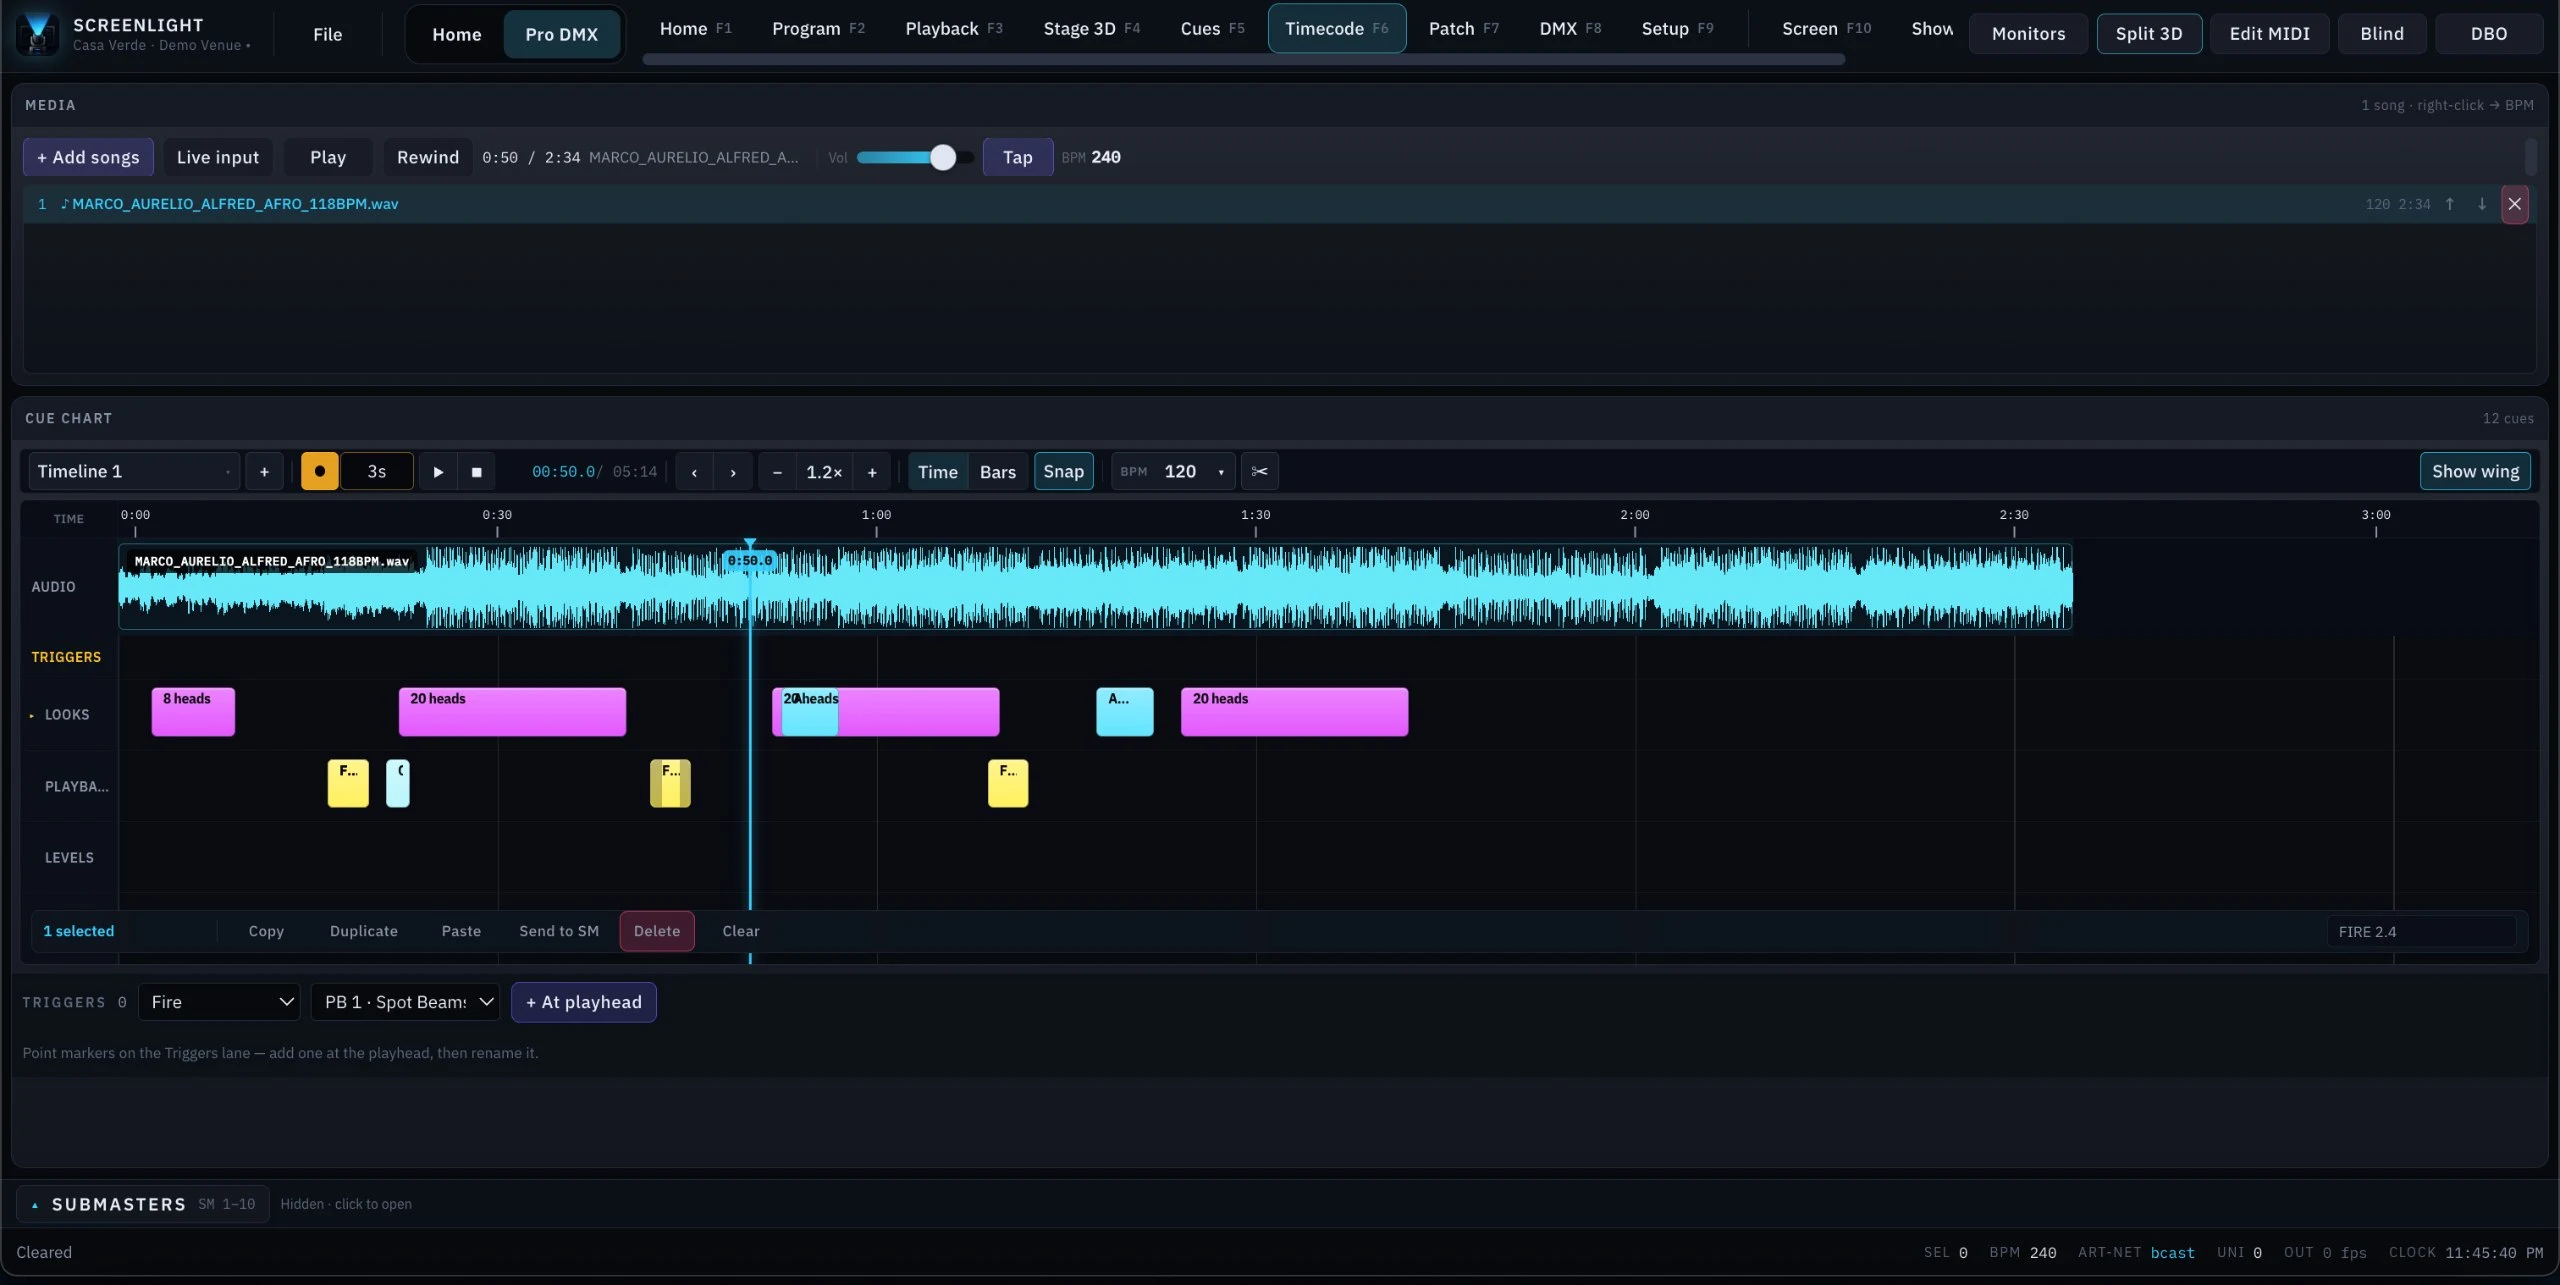
Load a song or take a live input and the waveform lands on the chart. Everything under it is edited the way a video editor is edited: drag a block, trim its edge, snap it to the beat, split it, drop it on another lane. Looks, Playback, Levels and Triggers each get their own lane, cues record straight at the playhead, and the ruler switches between time and bars. No dialog, no mode, no four clicks through a tree to reach a cue.
- Record at the playhead — no cue-number bookkeeping first
- Drag, trim, split and snap blocks directly on the lane
- Read the ruler in time or in bars, at any zoom
- Timecode chase, or tap the tempo by hand
- Send any block straight to a submaster
- Several timelines per show file
Show ControlF11
Build the desk you actually want.
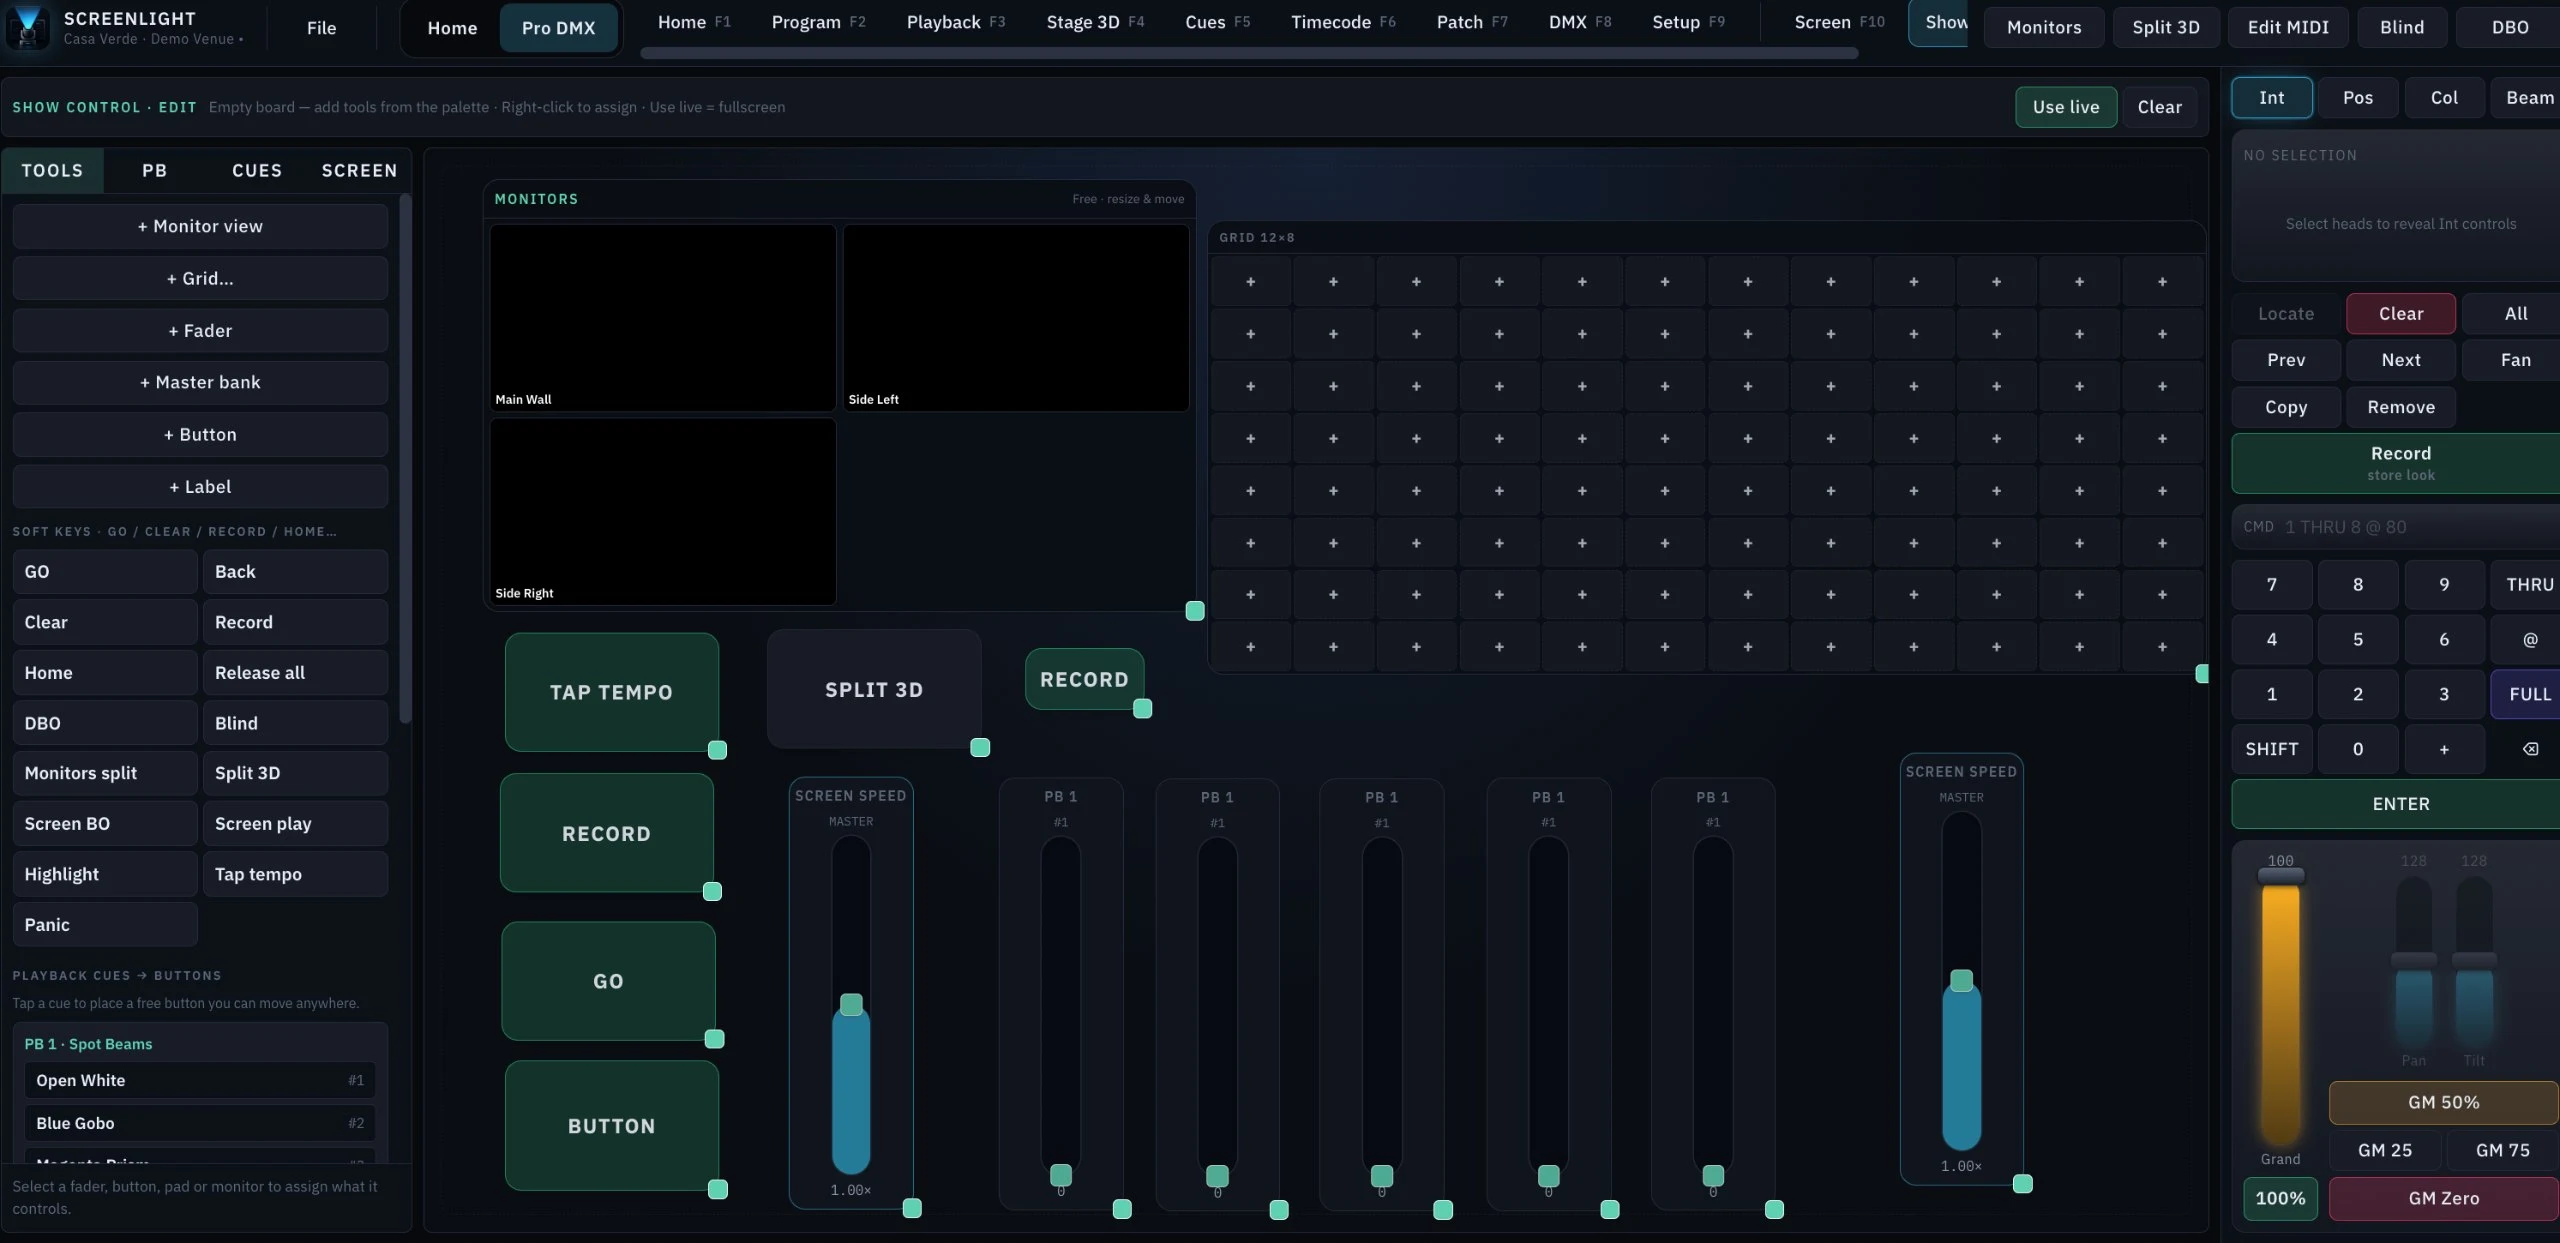
This is the part that makes “no console” literal. Drop faders, buttons, grids, master banks, labels and live monitor views onto a blank board, drag them anywhere, and assign each one to a playback cue or a soft key — GO, Back, Clear, Record, Release all, Blackout, Highlight, Blind, Tap tempo, Panic. Then run the board fullscreen and never see a menu for the rest of the night.
- Faders, buttons, grids, master banks, labels and monitor views
- Free placement — resize and move anything, then run it fullscreen
- Any playback cue becomes a button you can put where your hand already is
- Soft keys for GO, Release all, Blackout, Highlight, Blind and Panic
- The layout is part of the show file, so the desk travels with the show
Stage 3D · F4
The room, in the application.
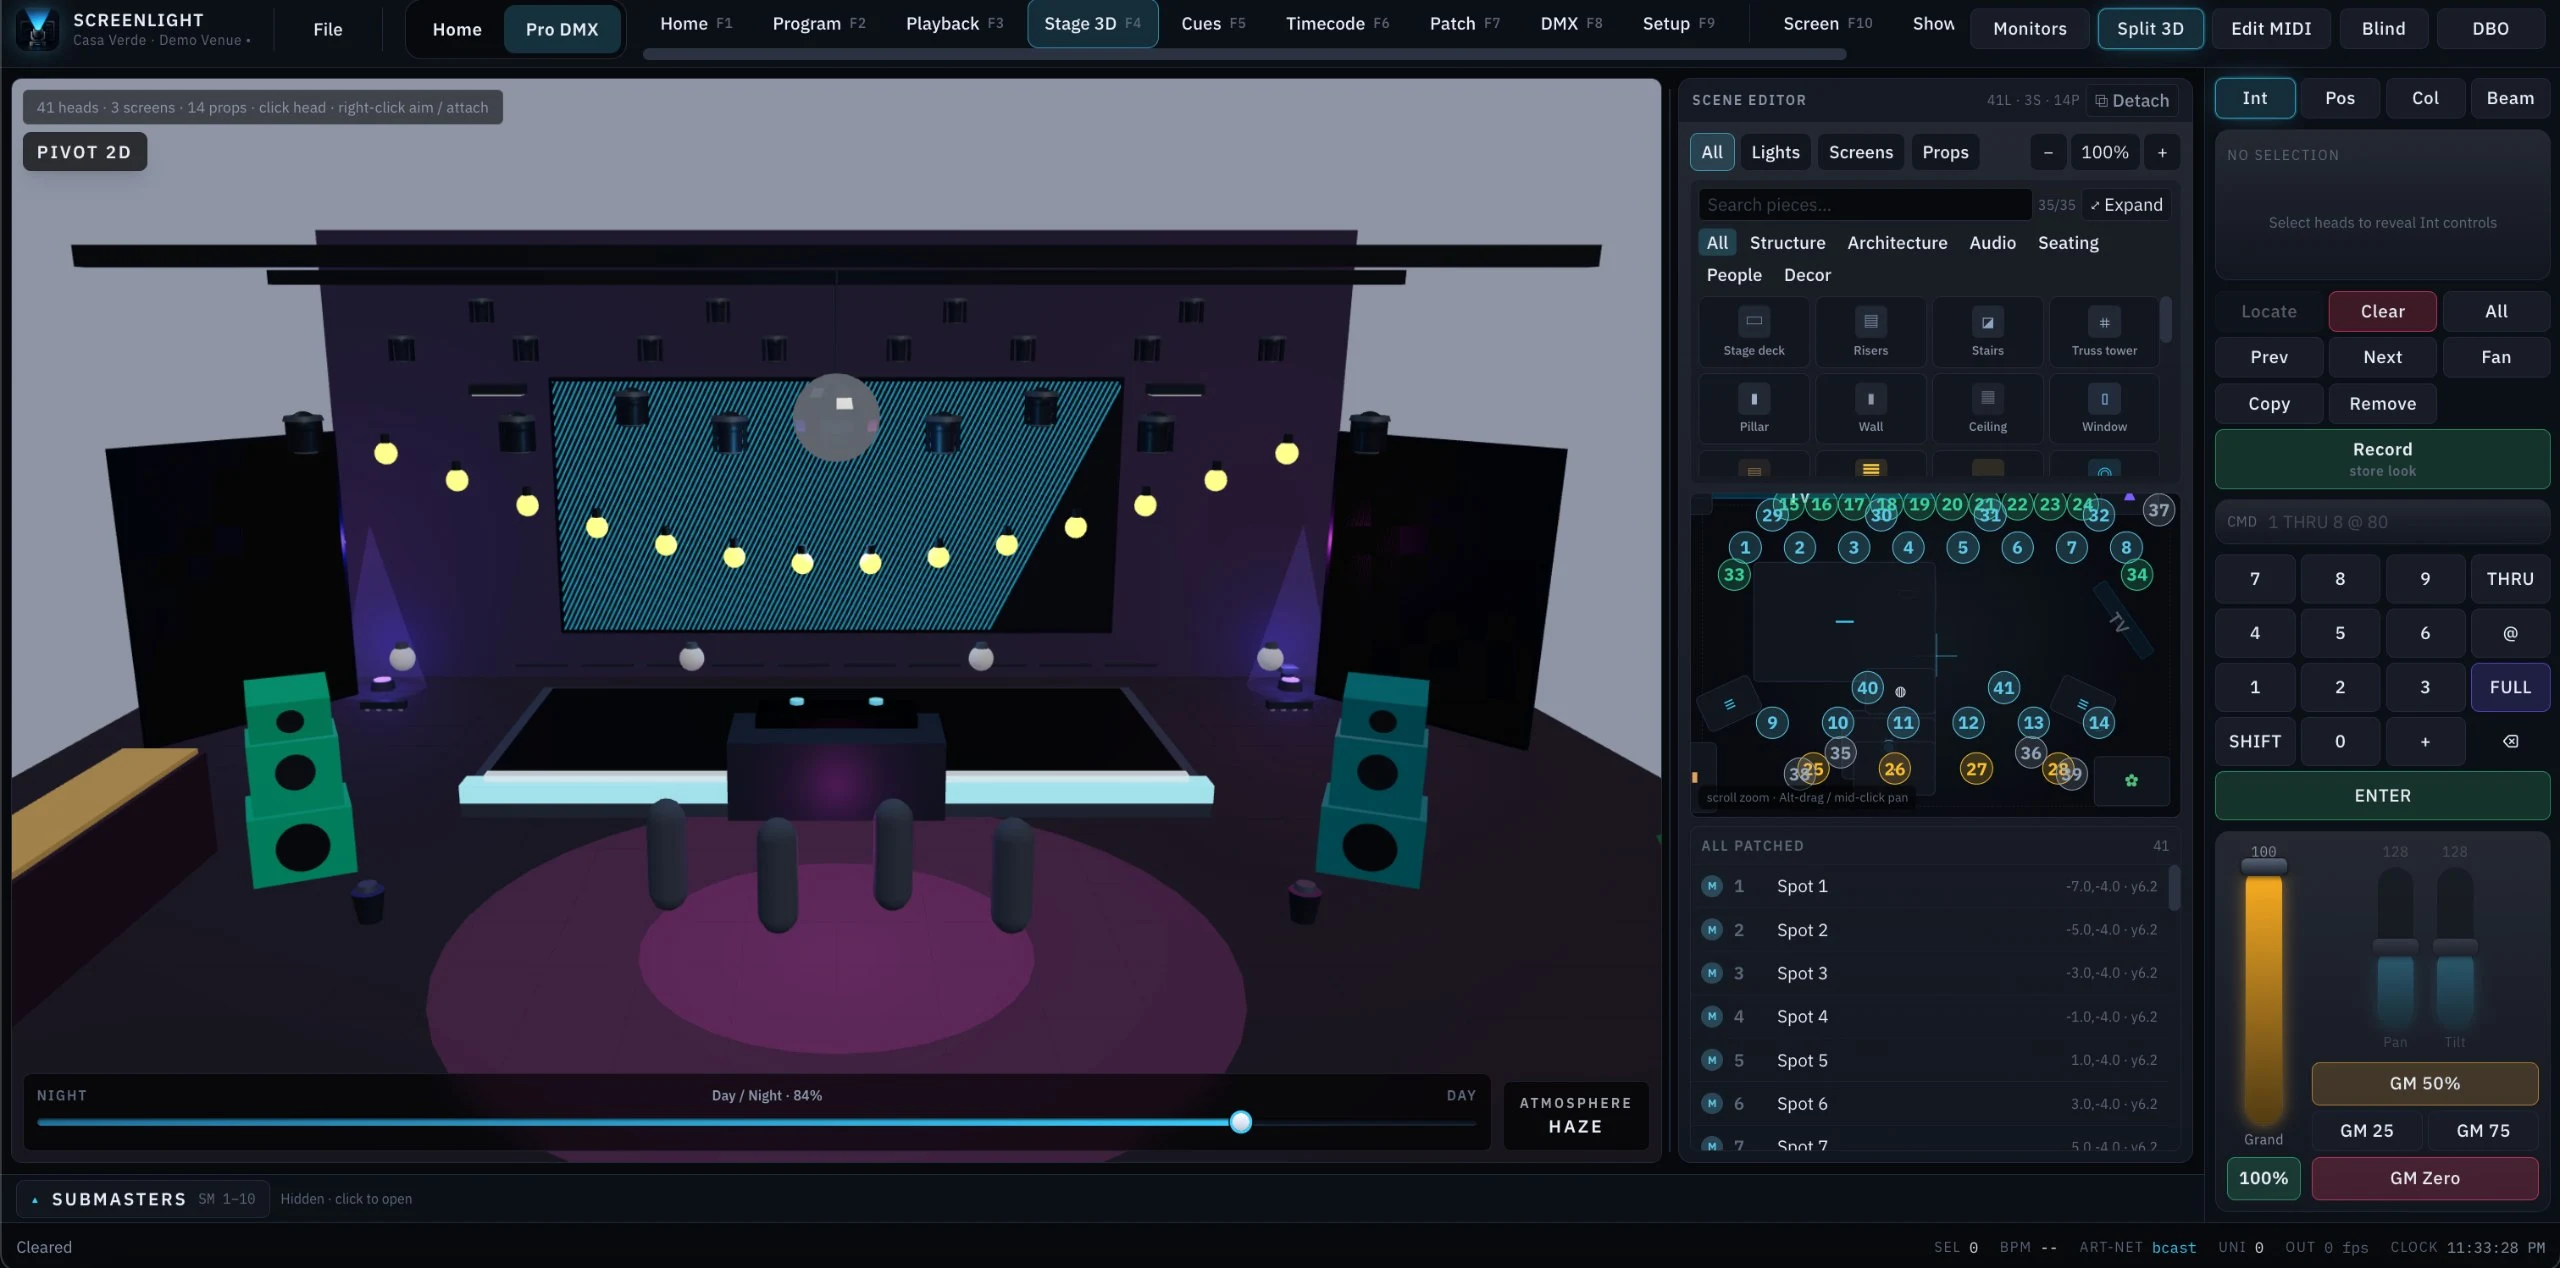
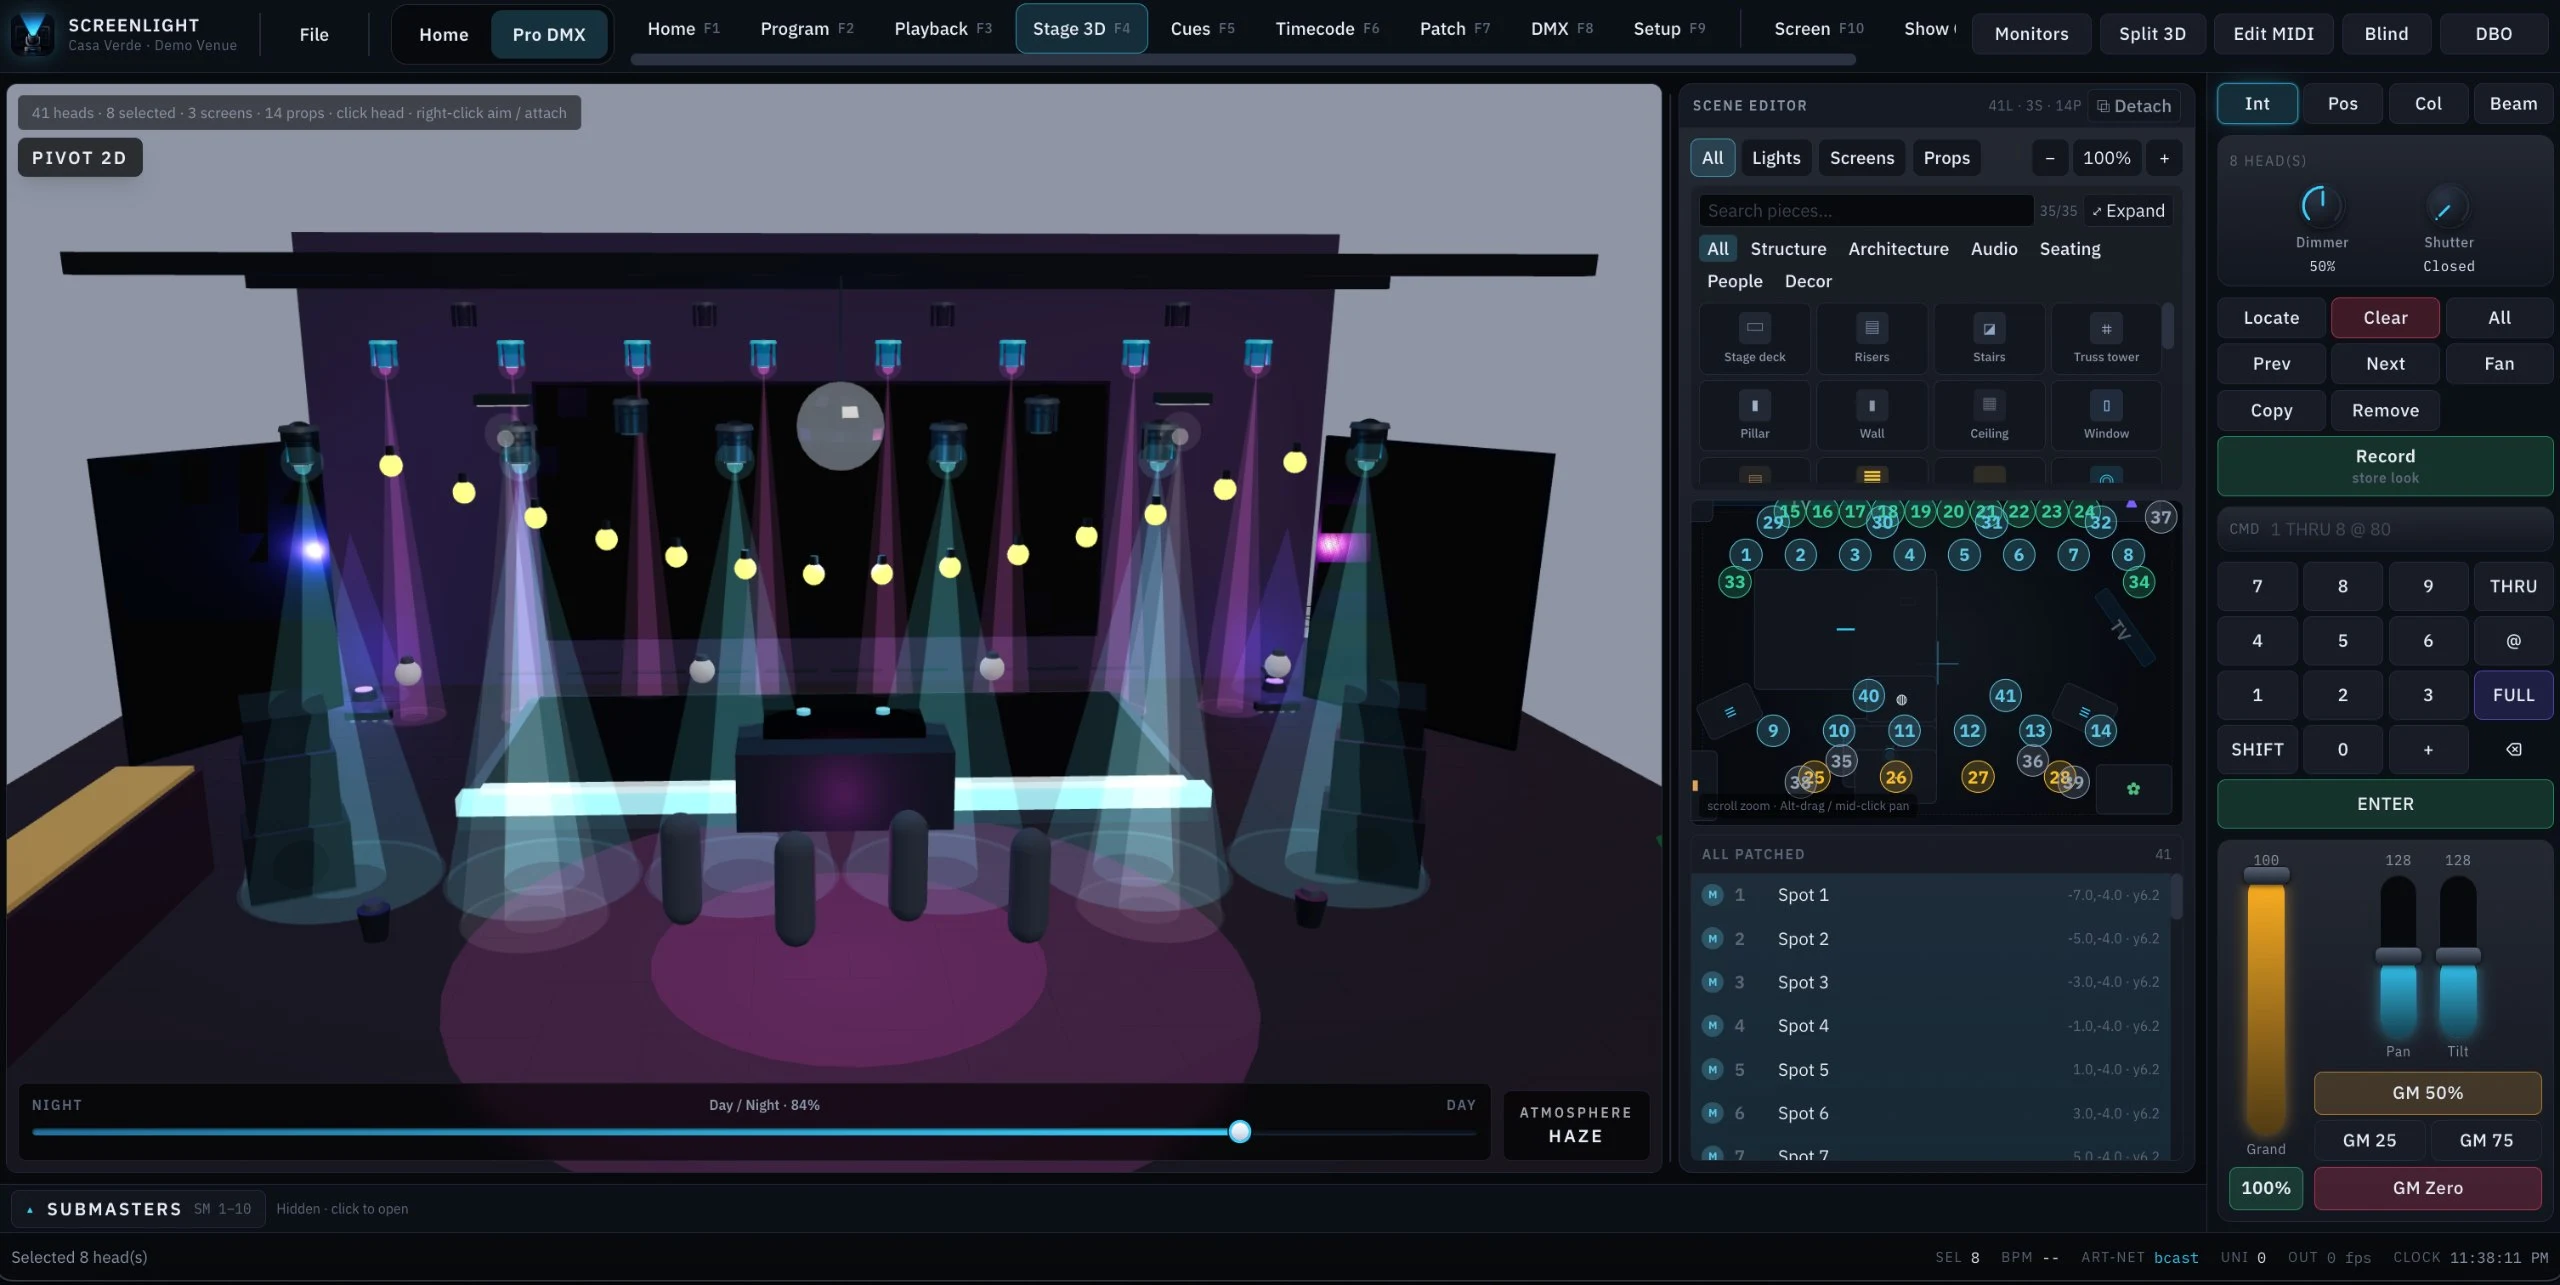
The home page shows the idea as a schematic you can aim with a pointer. This is the page itself: the Scene Editor building a venue out of real pieces, and the same room once the rig is lit.
The plot and the show file are the same document.
Pivot 2D is the drawing you would have made in a separate CAD package, except it is live: what is on the sheet is what is patched, addressed and mapped.
The plan is the patch
Every patched head carries an X, Y and Z alongside its universe, address and mode. Move a fixture on the plan and the 3D view, the addressing and the aim all follow it — there is no second document to keep in sync.
One sheet for every device class
Fixtures, LED walls, TVs and projector throws are all drawn to the same measure. Screens are placed in metres and aimed on stage exactly the way a light is.
Cut the wall into whatever shape it is
The mapping canvas slices a screen with rectangles, circles, polygons or freehand shapes, each with its own position, size and rotation, each able to inherit the composition or run its own content. Irregular walls and off-axis panels included.
Keep going
That is five of the eleven pages.
The rest — Home, Playback, Cues, Patch, DMX and Setup — sit behind the same function keys in the same window, and the wiring is written up in the documentation.